Building a blog-aware static website using Swift

Are you a Swift developer eager to share your knowledge but overwhelmed by the thought of dealing with HTML, CSS, JavaScript, or maintaining servers and databases?
Then you are in the right place! I will show you how to quickly setup a static blog using our beloved Swift language and GitHub Pages. And then you can focus on what you do best — writing awesome content.
Static Site Generators
Static site generators can take your Markdown content, apply a template and produce a complete static HTML website. This results in fast, secure, and scalable sites because there’s no dynamic content to slow things down or open up security vulnerabilities.
Ignite
Ignite is an open-source static site generator made for Swift developers by Paul Hudson. It leverages a SwiftUI-like syntax to facilitate website creation. This approach enables you to easily build websites without needing any prior knowledge of HTML or CSS.
GitHub Pages
GitHub Pages is a static site hosting service that takes files from a GitHub repository, runs them through a deployment process, and publishes a website. You can host your site on GitHub’s github.io domain or use your own custom domain.
Getting started
Prerequisites
It’s best to install the Ignite CLI tool, because it can help with validating and running the website locally.
- Open terminal and run
git clone https://github.com/twostraws/Igniteto clone the repository. - Change into the Ignite folder:
cd Ignite. - Run
make installto build and install the Ignite command-line tool. - If that command fails because of permissions issues, try running
sudo make installinstead.
Before moving to the next steps, make sure your computer is prepared with:
- git: to do all repository operations and publish the posts.
- A GitHub account: where you can create a repository and integrate with GitHub Pages, where the blog will be hosted.
- Swift: to compile that code to generate the website.
- python 3: to run a local HTTP server where the website will be hosted.
Creating a static website
Let’s start by creating a simple static website.
Setting up
- Go to GitHub and create a repository where the static blog will be hosted.
- Clone the repository to your computer, so you can start working on it and push all the changes later on.
Creating a project
On terminal, navigate to the root folder of the recently cloned repository.
Run the command below to create a standalone executable Swift package:
swift package init --type executable --name BlogNow, run the command below to open the project on Xcode:
open Package.swiftConfiguring project and dependencies
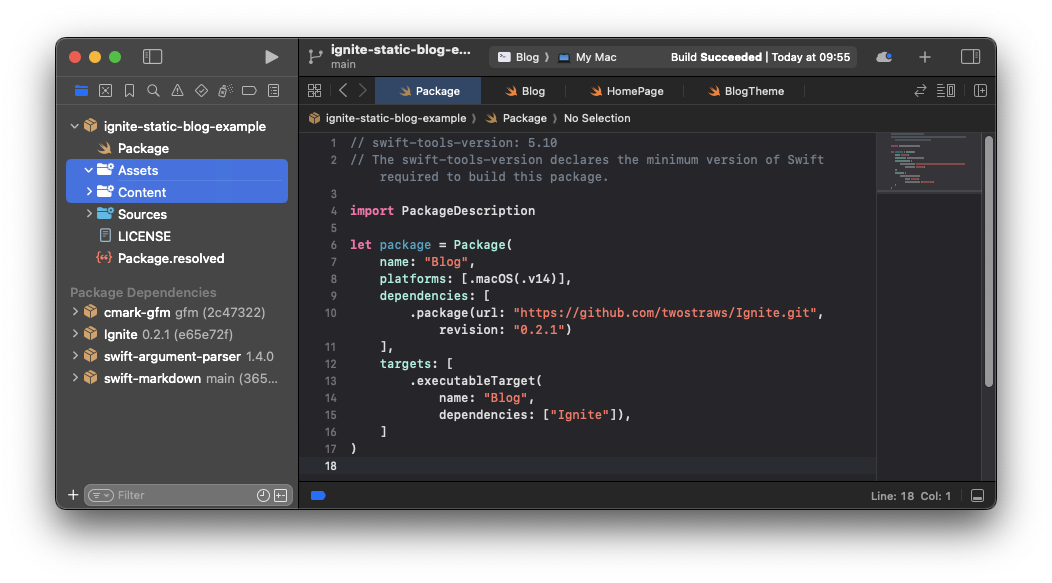
On Xcode, edit the Package.swift file so it looks like below:
// swift-tools-version: 5.10
// The swift-tools-version declares the minimum version of Swift required to build this package.

import PackageDescription

let package = Package(
    name: "Blog",
    platforms: [.macOS(.v14)],
    dependencies: [
        .package(url: "https://github.com/twostraws/Ignite.git", branch: "main")
    ],
    targets: [
        .executableTarget(
            name: "Blog",
            dependencies: ["Ignite"]),
    ]
)
Now, save the file and let SPM resolve the dependencies.
Project folder structure
There are some folders which are essential to Ignite:
- Assets: For additional files to be deployed, such as images and documents.
- Content: Content written in Markdown, that will become the pages of the website.
Without these folders, the build command will not generate content inside the Build folder. So make sure your project folder structure looks like below:
Configuring the site
Let’s create the fundamental parts of the blog.
Remove the main.swift file from the Sources folder. We’re going to add an entry point later.
Home Page
Add a new Swift file named HomePage.swift. This will be the homepage for your site; what the users land on when visiting the root of your site.
Copy and paste the code below.
import Foundation
import Ignite

struct HomePage: StaticPage {
    // The title for this page.
    var title: String

    init(title: String) {
        self.title = title
    }

    // Provides the content of this page using a block element builder.
    func body(context: PublishingContext) async -> [BlockElement] {
        Text {
            "Hello, world!"
        }.font(.title1) // translates into h1 HTML tag
    }
}
Theme
Next, create a new Swift file named BlogTheme.swift. This will be the theme to apply to your site. It will be used to render all pages that don’t explicitly override the theme with a custom theme.
Copy and paste the code below.
import Foundation
import Ignite

struct BlogTheme: Theme {
    func render(page: Page, context: PublishingContext) -> HTML {
        HTML {
            Head(for: page, in: context)
            Body {
                page.body
            }
        }
    }
}
Blog
Next, a crutial part to build and get the website running - create a new Swift file named Blog.swift. This will provide Ignite with essential information to the website.
Copy and paste the code below.
import Foundation
import Ignite

@main
struct Blog: Site {
    // The name of your site (Required)
    var name = "My personal blog"
    // The base URL for your site (we're going to use GitHub Pages)
    var url = URL("https://<YourUsername>.github.io")

    // Assign the previously create theme to your website
    var theme = BlogTheme()
    // Assign the previously created HomePage as homepage to your website
    var homePage = HomePage(title: "Home")

    // This is the new application's entry point
    static func main() async {
        let blog = Blog()
        do {
            // Will perform the publishing flow and generate the website content
            try await blog.publish()
        } catch {
            print(error.localizedDescription)
        }
    }
}
Running the website locally
You have put all the main pieces together. Now, it’s time to publish and run the website locally to check how it looks!
Using Ignite CLI
On terminal, navigate to the repository’s root folder and run:
ignite buildIgnite will use Swift to compile the code, and then generate the website.
Now, run the command below:
ignite run --previewIgnite will validate the website, and then open a new tab/window on your default web browser to navigate to the local website. You should see something like this on your terminal:
✅ Starting local web server on http://localhost:8000
Press ↵ Return to exit.
… and there it is!
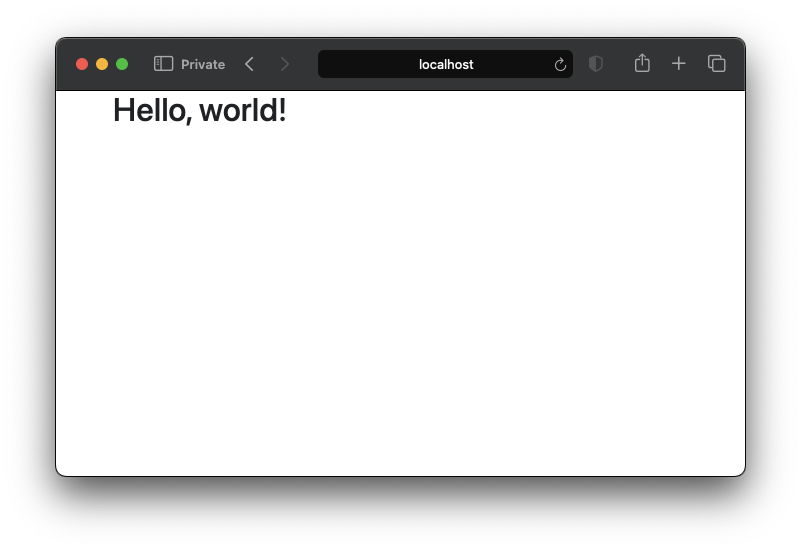 You should see a blank page with the “Hello, world!” printed on it.
Force run
If you get an error message as below:
❌ A local web server is already running on port 8000.Then try running the same command with the --force parameter. This will terminate the previous server and start a new one.
ignite run --preview --forceAlternative
Another way to run the website locally is to run the executable scheme on Xcode, and then run the following command from the Build/ folder generated:
python3 -m http.serverThat is what the ignite run command does internally, plus a few other things, such as validating and launching the browser to preview the local website.
Writing your first blog post
Now that you can run the server and display the Hello, world! page, let’s move into creating content for your blog and publishing them.
The BlogPost content page
On Xcode, create a new Swift file named BlogPost.swift inside the Sources folder.
Copy and paste the code below. This ContentPage will tell Ignite how each blog post page should look like.
import Foundation
import Ignite

struct BlogPost: ContentPage {
    // Similar to HomePage, this provides the content of a blog post page
    func body(content: Content, context: PublishingContext) -> [BlockElement] {
        // This will print the title on a h1 tag
        Text(content.title).font(.title1)
        // Displays the tags related to the post separated by coma
        Text("Tags: \(content.tags.joined(separator: ", "))").font(.body)
        // Displays the size and estimated reading time
        Text("\(content.estimatedWordCount) words; \(content.estimatedReadingMinutes) minutes to read.").font(.body)
        // Just like in SwiftUI, this adds a spacer between two elements
        Spacer()
        // The post body
        Text(content.body).font(.body)
    }
}
Creating the content for your first post
It’s time to write your first post! To do that with Ignite, we use Markdown syntax to write the post content, and Jekyll’s front-matter-like syntax to add meta-data to the post on the top of the file.
Create a post folder inside the Content folder; Then create an empty file inside the post folder and rename it to my-first-post.md and open it.
Copy and paste the code below.
---
author: Jobert Sá
date: 2024-05-15 10:30
tags: Swift, Ignite, GitHub Pages, GitHub Actions, Blog
layout: BlogPost
published: true
---
# My First Post

This is a blog post written using Markdown.
This is an example of a blog post format supported by Ignite.
It’s important to write it with correct format, otherwise the post might not be recognized and published. A few important fields to note:
date: Must be specified in the formatYYYY-MM-DD HH:MM:SS +/-TTTT; hours, minutes, seconds, and timezone offset are optionaltags: All tags related to the post separated by comalayout: The layout of the post, how it should look like. In our case, it’sBlogPost, like the struct we createdpublished: Tells Ignite whether the post should be published or not (won’t be published into theBuild/contentfolder)
Displaying the blog posts
You wrote your first post and created the layout to display it.
List all the blog posts on the Home Page
It’s time to list your posts on the HomePage, so your followers can access them.
Go back to the HomePage.swift file and add the following lines below the existing Text element:
// Adds a spacer between the header and list of posts
Spacer()
// Group all post div tags into one tag
Group {
    for content in context.content(ofType: "post") {
        // Print each link to a post inside a separate div tag
        Group { Link(content) }
    }
}
Registering the BlogPost layout
Now go to the Blog.swift file and add the following lines below the homePage property:
// Register all supported page layouts
var layouts: [any ContentPage] {
    BlogPost()
}
This is done to tell Ignite what layouts to recognize during the site publishing. If the layout of a content is not listed here, that content will not be published.
Build and preview the website again
Now let’s see how our blog website looks like!
On Terminal, press ↵ Return to exit the running server, then run ignite build and then ignite run --preview again.
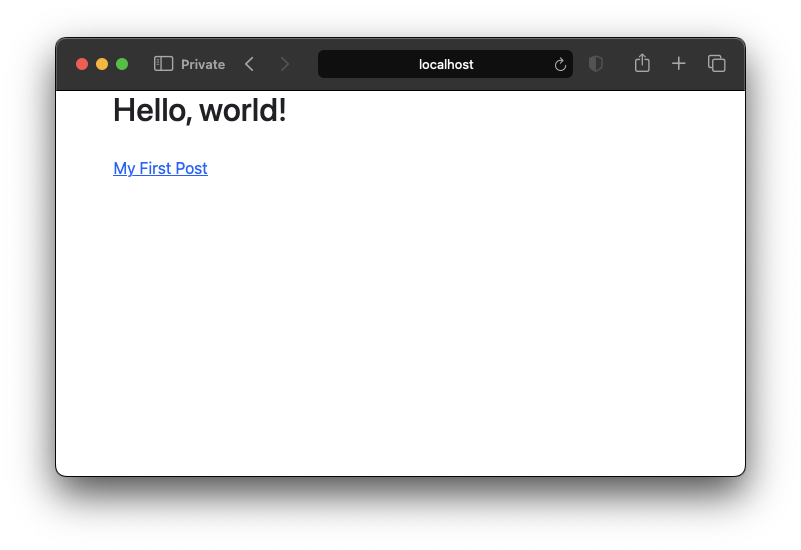
Your Home Page should look like below:
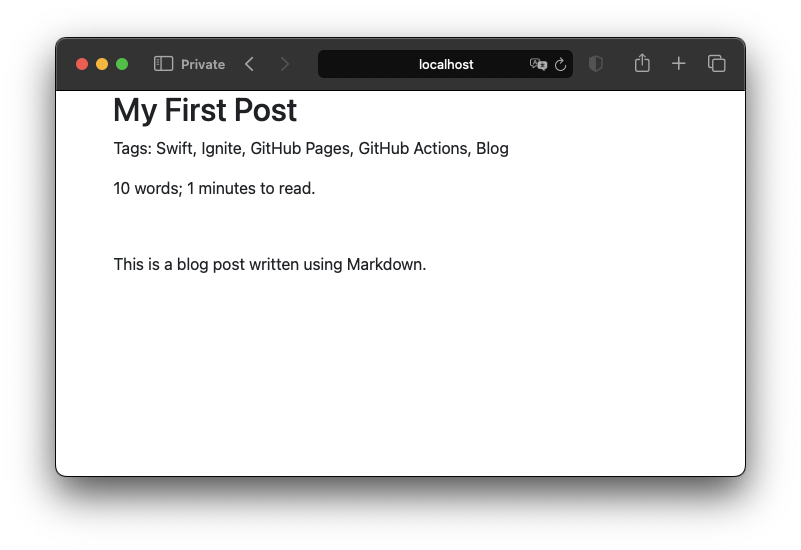
Now click on that first post, you should be redirected to the blog post page, and it should look like below:
You can now edit the post as you wish and add more posts to populate your blog. Then build and run again to see the updates.
This is your blog written in Swift!
It’s only running locally though. So let’s get it to GitHub Pages, so everyone online can access it.
Deploying to GitHub Pages
Before moving to the next steps, it’s important to check the Build/ folder is ready to be deployed. Make sure it’s removed or commented out in the the .gitignore file.

Now, commit and push all your changes to the remote, so everything will be on your repository on GitHub, including the Build folder.
GitHub Pages setup
Let’s setup a GitHub Action to deploy your website to GitHub Pages.
- Go to your repository page on GitHub and open Settings and then Pages, under code and automation.
- Under Build and deployment, select GitHub Actions as Source.
- Now, go to Actions on your repository, click on New workflow, and select set up a workflow yourself.
- On the editor enter the YAML code below to setup the deployment workflow
# Workflow for deploying the static blog website GitHub Pages
name: Deploy the blog to GitHub Pages

on:
  # Runs on pushes targeting the main branch
  push:
    branches: ["main"]

  # Allows to run this workflow manually from the Actions tab
  workflow_dispatch:

# Sets permissions of the GITHUB_TOKEN to allow deployment to GitHub Pages
permissions:
  contents: read
  pages: write
  id-token: write

# Allow only one concurrent deployment, skipping runs queued between the run in-progress and latest queued.
# However, do NOT cancel in-progress runs as we want to allow these production deployments to complete.
concurrency:
  group: "pages"
  cancel-in-progress: false

jobs:
  deploy:
    environment:
      name: github-pages
      url: ${{ steps.deployment.outputs.page_url }}
    runs-on: ubuntu-latest
    steps:
      - name: Checkout
        uses: actions/checkout@v4
      - name: Setup Pages
        uses: actions/configure-pages@v5
      - name: Upload artifact
        uses: actions/upload-pages-artifact@v3
        with:
          path: './Build'
      - name: Deploy to GitHub Pages
        id: deployment
        uses: actions/deploy-pages@v4
Click on Commit changes to save these changes. It will also trigger this workflow right away.
If you move to the home page of your GitHub repository, you should see the following badge under Deployments:
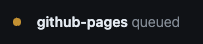
Click on it to go to the deployments page. There, you should find the details of the latest deployments:
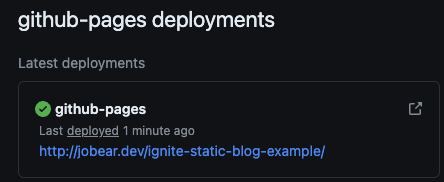
Wait until the deployment finishes and the badge becomes green, like the image above.
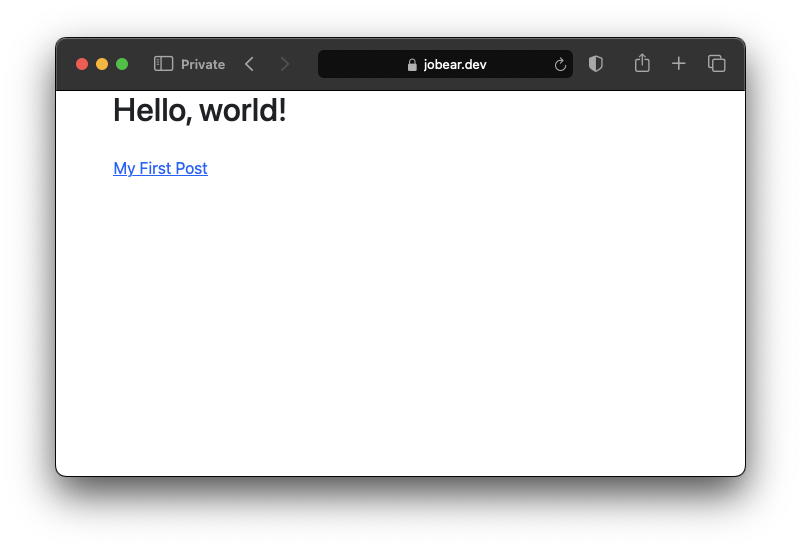
Now, click on the link on the deployment panel to open the deployed site.
And there it is - your blog hosted on GitHub Pages!
Now, you can share the link to your blog with your friends and colleagues, so they can check your posts.
Next steps
Looking for what to do next?
References
Here are couple of references that might be useful for you:
- GitHub repository of the project created with this article
- The deployed blog
- Ignite
- Sample code for the Ignite
Customizing the website
The website where you are reading this very article, right here, was made using Swift, Ignite and GitHub Pages, just like detailed earlier.
I did do couple of customizations, to make it look like this.
If you understand HTML, CSS and JavaScript, and would like to move your website to the next level, I suggest starting with couple of things:
- Subclassing
Component: you can create your own page components that can be reused across the website - Create components for the heading, footer, or even a navigation menu
- Create your own
Theme, and add a custom HTMLheader, where you customize the stylesheet for the layout of your pages - Adjust your custom CSS to improve the layout of the pages
- Add Javascript scripts to your page to add more dynamic to it, or to add other functionalities
Other ideas
If you have any suggestions or ideas for improvement, feel free to reach me out on any of my social medias. I would really appreciate any feedback! Also, if you found this useful, please share so it can reach out more people!